You want a quick, tasty lunch that’s healthy and ready in under 30 minutes. I’ll show you a simple vegetable curry that uses pantry spices, fresh or frozen veggies, and a creamy base so you can make a filling meal without fuss. This curry cooks fast, tastes great, and adapts to whatever vegetables and spices you have on hand.
I’m Emma Reed and I tested this recipe until it was easy enough for busy days. I’ll walk you through clear steps, swap ideas, and give tips to store and reheat leftovers so lunch stays simple and satisfying.
Key Takeaways
- Use simple spices and common vegetables for a quick curry.
- The recipe adapts to pantry items and frozen veggies.
- Leftovers store well and reheat for easy lunches.
Contents
What Is an Easy Vegetable Curry?

I make this curry when I want a quick, low-fuss lunch that still tastes full and satisfying. It centers on simple spices, mixed vegetables, and a creamy base that comes together in one pot.
Key Features of This Curry
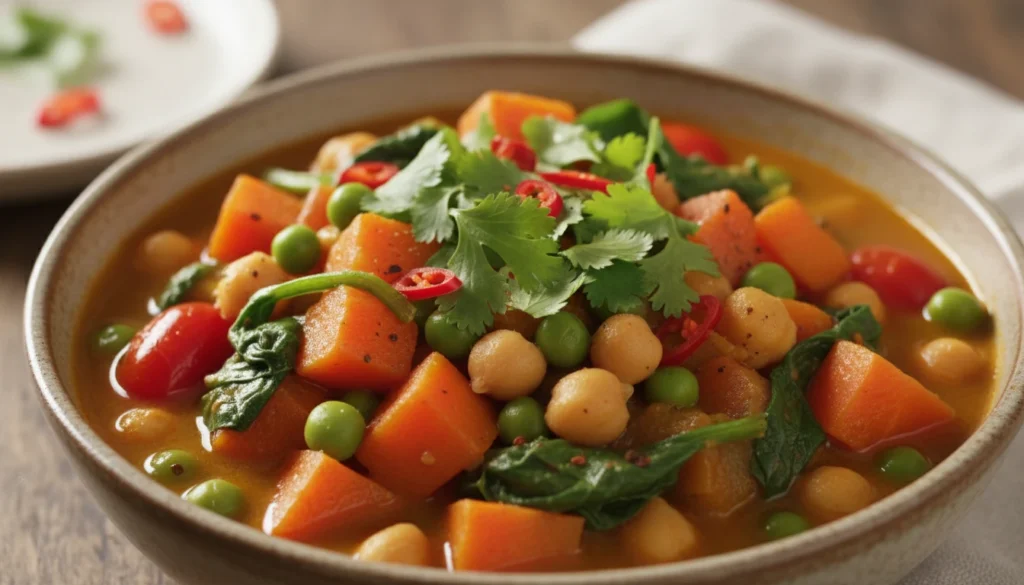
I use common vegetables like potatoes, carrots, peas, and bell pepper so you can build the dish from what’s in your fridge. Protein comes from chickpeas or lentils when I want a heartier meal. The sauce is usually tomato-based or coconut-milk based, thickened slightly by simmering or a spoonful of yogurt.
Spice-wise, I stick to a short list: cumin, coriander, turmeric, and garam masala or curry powder. This keeps flavor balanced without complex techniques. I often use frozen mixed vegetables to save time and reduce prep.
Equipment needs are minimal: one deep skillet or pot, a cutting board, and a spoon. That makes it easy to cook on a busy weekday.
Benefits of a Simple Recipe
A simple curry saves time. I can chop vegetables, sauté aromatics, add spices, and simmer everything in 25–35 minutes. This fits well into a lunch break or a quick weeknight routine.
It’s budget friendly. Using canned chickpeas, frozen vegetables, and pantry spices keeps cost low. I also get flexible nutrition: I can increase protein with beans or add leafy greens for vitamins.
This approach reduces cleanup. One-pot cooking means fewer dishes. I can portion leftovers for the week, which helps meal planning and reduces food waste.
Differences from Traditional Curries
Traditional curries often build flavor through multiple stages: toasting whole spices, making a masala paste, and long simmering. I simplify that process by using ground spices and pre-made spice blends, which shortens cook time.
Authentic regional curries vary by technique and ingredient list. For example, South Indian curries use mustard seeds and curry leaves, while North Indian gravies may include cream or nuts. I borrow elements selectively but avoid lengthy prep.
Texture is also different. Traditional recipes might aim for a silky, emulsified sauce. I aim for a rustic, slightly chunky sauce that holds up well with rice or flatbread.
Links:
- For spice basics and techniques, I refer to guidance from the BBC Food spice primers.
- For safe coconut-milk handling and tips, I check resources at the U.S. FDA.
Essential Ingredients for Easy Vegetable Curry
I keep the ingredient list short and flexible so the curry cooks fast and tastes bright. Focus on vegetables that hold shape, a simple spice mix, and pantry swaps for vegan or gluten-free needs.
Best Vegetables to Use
I pick vegetables that cook evenly and give texture contrast. Good choices: carrots, cauliflower, bell peppers, zucchini, and potatoes. Carrots and potatoes take longer, so cut them small. Zucchini and bell peppers go in later to stay crisp.
Frozen peas or mixed vegetables save time and add color. Cauliflower florets soak up sauce well, making the curry feel richer. For leafy greens, stir in spinach at the end so it wilts but stays tender.
If you want protein, I add chickpeas or tofu. Chickpeas hold up during simmering; firm tofu absorbs spices when lightly pressed and cubed. These choices keep the curry hearty without long prep.
Recommended Spices and Aromatics
I start with onion, garlic, and fresh ginger as the flavor base. Sauté them until soft and fragrant. Use ground turmeric, cumin, and coriander for warmth, plus garam masala or curry powder for depth.
Typical amounts: 1 medium onion, 3 garlic cloves, 1 tablespoon grated ginger, 1 teaspoon turmeric, 1 teaspoon cumin, 1 teaspoon coriander, and 1 teaspoon garam masala. Adjust salt and a pinch of sugar to balance acidity.
For extra flavor, add mustard seeds or curry leaves at the start and finish with lemon juice or a splash of coconut milk. I follow guidance from reliable sources like the BBC Good Food or Serious Eats for cooking technique and spice proportions. (https://www.bbc.co.uk/food)
Vegan and Gluten-Free Ingredient Options
I avoid dairy by using full-fat coconut milk or canned tomatoes for creaminess. Coconut milk also adds a mild sweetness that pairs well with spices. Use coconut oil or neutral oil for cooking to keep it vegan.
For gluten-free, I check spice blends and stock labels for hidden gluten. Most single spices are naturally gluten-free. For thickening, I use pureed cooked vegetables or cornstarch slurry instead of flour.
For store-bought items, read labels on curry pastes and bouillon. If I need a quick swap, tamari replaces soy sauce for gluten-free umami. For more guidance on allergens and safe swaps, I refer to trusted food safety resources like the FDA. (https://www.fda.gov)
Step-by-Step Cooking Instructions

I show exact prep, timing, and heat control so the curry cooks evenly and tastes balanced. Follow the order: chop, build the sauce, then add vegetables and simmer until tender.
Preparing the Vegetables
I start by washing all produce under cold water. I peel and dice one onion into small pieces, mince 3 cloves of garlic, and grate a thumb-sized piece of ginger. I cut firm vegetables—carrots and potatoes—into 1/2-inch cubes so they cook through at the same time. Softer veggies like bell pepper and zucchini go into 1/2-inch pieces too, added later in the cook.
I thaw or drain frozen peas and corn if used. For canned chickpeas, I rinse and drain them. I keep vegetables in separate bowls by cook time: longer-cook (potato, carrot), medium (cauliflower, green beans), quick (spinach, peas). This grouping prevents overcooking.
Cooking the Curry Base
I heat 1–2 tablespoons of oil in a large skillet or pot over medium heat. I add the diced onion and cook until translucent, about 5–7 minutes, stirring occasionally. Next I add the garlic and ginger and cook 30–60 seconds until fragrant.
I stir in 1–2 tablespoons curry powder or 2 tablespoons Thai red curry paste, coating the onion mix for 30 seconds to bloom the spices. I pour in one 14-ounce can of coconut milk and 1/2 cup vegetable broth, scraping browned bits from the pan. I taste and season with 1 teaspoon salt and a pinch of sugar to balance acidity. For spice control, I add 1/4–1/2 teaspoon chili flakes only if I want heat.
(For spice details and safety tips, I often reference the USDA guidance on safe handling of produce: https://www.usda.gov.)
Combining and Simmering
I add the longest-cooking vegetables first and bring the sauce to a gentle simmer. I cover and cook 10–12 minutes, then stir and add medium-cook vegetables and chickpeas. I simmer uncovered for another 6–8 minutes until all pieces are fork-tender.
I finish by stirring in quick-cook greens and frozen peas, cooking 1–2 minutes. I adjust salt and a squeeze of lime or 1 teaspoon vinegar for brightness. I let the curry rest off heat for 2 minutes before serving over rice or with naan. For texture tips and serving ideas, I check reliable recipe resources like Serious Eats: https://www.seriouseats.com.
Tips for Customizing Your Curry
I focus on two simple changes that make a big difference: control the heat precisely, and add protein that suits your schedule and taste. These choices change the curry’s texture, cooking time, and how filling it feels.
Adjusting Spice Levels
I start by measuring chili and curry paste in teaspoons, not pinches. For mild heat, I use 1/2 teaspoon of chili powder or 1 tablespoon of mild curry paste for a pan that serves four. For medium, I increase to 1–1.5 teaspoons or 2 tablespoons of paste. For high heat, I add fresh chopped chilies or 1–2 teaspoons of cayenne at the end so the spice stays bright.
I balance spiciness with dairy or coconut milk. Adding 1/2 cup of coconut milk or a dollop of yogurt tames heat without hiding flavor. Acid helps too: 1 teaspoon lime juice or vinegar brightens the curry and makes strong chilies seem less harsh.
If someone’s sensitive to spice, I remove seeds from fresh chilies and add them slowly while tasting. I also keep neutral sides like rice or naan on hand to dilute the heat per bite.
Adding Protein for a Heartier Meal
I choose protein based on time and diet. Canned chickpeas or lentils are fastest: rinse one 15-oz can and simmer 5–10 minutes so they soak up sauce. Firm tofu works well—press, cube, and pan-sear for 6–8 minutes before folding into the curry to keep texture. For animal protein, cubed chicken cooks in 10–12 minutes in a simmering sauce.
I add frozen peas or spinach for extra bulk and nutrients without much prep. If I want creamy richness, I stir in 1/4 cup Greek yogurt or 1/3 cup full-fat coconut milk at the end. For food safety, I check internal temperature: 165°F for poultry and 145°F for fish.
For recipe ideas and protein timing, I often check USDA cooking guidance and simple legume tips on trusted sites like the USDA Food Safety pages or USDA MyPlate.
Serving Suggestions for Lunch

I focus on simple, tasty pairings that make the curry filling and easy to eat at work or home. Pick one starch, one simple side, and a small garnish to keep lunch balanced and quick.
Best Rice and Bread Pairings
I prefer basmati rice for lightness and aroma; cook 1 cup basmati with 1.5 cups water for fluffy grains. For a heartier option, use jasmine rice or brown basmati—brown adds fiber and keeps me full longer.
For bread, I reach for warm naan or a whole-wheat roti. Naan soaks up the sauce nicely; heat it in a dry pan for 30 seconds per side. Whole-wheat roti gives a firmer chew and pairs well if I want less oil.
If I need a low-carb option, I serve curry over cauliflower rice or a bed of steamed greens. Add a spoonful of yogurt or a squeeze of lime to brighten flavors. Top with cilantro or toasted seeds for crunch.
Make-Ahead and Meal Prep Ideas
I make a large pot of curry on Sunday and portion it into airtight containers for 3–4 lunches. Let curry cool, then refrigerate up to 4 days or freeze individual portions for 2–3 months.
For rice, I cook extra and store it separately to avoid soggy lunch bowls. Reheat rice in the microwave with a damp paper towel or steam it for 2–3 minutes.
To keep textures fresh, I pack crunchy toppings—chopped cucumber, fresh cilantro, or toasted peanuts—separately and add them after reheating. If I plan a quick stovetop reheat, I loosen the curry with a splash of water or coconut milk to restore sauciness.
Storage and Reheating Recommendations
I store curry in airtight containers, cool it quickly, and reheat only what I will eat. I pay attention to fridge times, freezer methods, and reheating steps to keep texture and safety.
Keeping Curry Fresh
I let the curry cool at room temperature no more than 1 hour, then move it to the fridge in shallow airtight containers. That speeds cooling and keeps the center below 40°F (4°C).
I label containers with the date and use refrigerated curry within 3–4 days. I avoid storing rice mixed with curry; rice spoils faster, so I keep rice separate and add it when reheating.
When reheating from the fridge, I heat only once and bring the curry to a steady simmer (165°F / 74°C) to kill bacteria. I stir often and add a splash of water or broth if the sauce has thickened. If vegetables look soggy, I finish with fresh herbs or a squeeze of lemon for brightness.
Freezing and Thawing Tips
I freeze curry in portion-sized airtight containers or heavy-duty freezer bags, leaving a little headspace for expansion. Most vegetable curries freeze well for up to 2–3 months for best quality; label with date and contents.
To thaw, I move a portion to the fridge overnight or use the microwave’s defrost setting if I need it faster. Thawed curry shows best texture when reheated gently on the stove over medium heat, stirring and adding a splash of water if needed. I never refreeze curry once it has been fully thawed and reheated.
Nutritional Benefits of Vegetable Curry
I often choose vegetable curry for lunch because it packs a lot of nutrients in one bowl. The mix of vegetables gives fiber, vitamins, and minerals that help keep me full and support digestion.
Many curries include ingredients like tomatoes, carrots, peas, and potatoes. These provide vitamin A, vitamin C, potassium, and folate. I get immune support from vitamin C and eye and skin support from vitamin A.
Spices such as turmeric, ginger, and garlic add more than flavor. I benefit from antioxidants and anti-inflammatory compounds that these spices supply. Turmeric’s curcumin, for example, is linked to reduced inflammation in studies.
Protein can come from chickpeas, lentils, or peas in the curry. I add one of these to make the meal more balanced and to help maintain energy through the afternoon.
Here’s a quick nutrient snapshot I use when planning meals:
- Fiber: aids digestion and fullness.
- Vitamins A & C: support vision and immunity.
- Potassium: helps with fluid balance and blood pressure.
- Plant protein: supports muscle and repair.
- Antioxidants: reduce oxidative stress.
I can also control calories and sodium by using light coconut milk or less oil and salt. That makes the curry a healthy, flexible option for a simple lunch.
FAQs
Can I make it gluten-free and vegan?
Absolutely. I use coconut milk and vegetable broth to keep it vegan, and none of the core ingredients contain gluten. Always check labels on spice mixes or broth to be safe.
What sides do I serve with it?
I like rice, naan, or a simple salad. Leftovers also taste great wrapped in a flatbread for a quick weekday meal.
How do I adjust the spice level?
I add chili gradually. Start with a small pinch and taste as it cooks. You can also remove seeds from fresh chilies to reduce heat.
Can I batch-cook and freeze it?
Yes. I cool it completely, then freeze in portioned containers for up to 3 months. Thaw overnight in the fridge before reheating.
What about protein options?
I often add canned chickpeas, tofu, or paneer for more protein. Lentils also work well and cook directly in the curry.
Quick tips for thicker or thinner sauce:
For thicker: simmer longer or mash some vegetables.
For thinner: stir in a little water or broth, a tablespoon at a time.
If you want a reminder of ingredient swaps or a shopping list, I can make one for you.
Conclusion
I like this vegetable curry because it is simple, flexible, and full of fresh flavor. It works well for a quick lunch, meal prep, or a cozy weeknight meal.
I use whatever vegetables are in season or in my fridge, and I adjust spices to match my mood. The one-pot method keeps cleanup easy and helps flavors meld.
If I want protein, I add chickpeas or tofu; for creaminess, I stir in coconut milk or yogurt. Leftovers stay tasty for several days and make a fast reheatable meal.
Try small changes each time: different vegetables, a squeeze of lemon, or a sprinkle of herbs. These little tweaks keep the dish interesting without adding work.