
Push-Down Chopper Blade Grid: Use & Care Guide

Quick Answer
A push-down chopper blade grid is a set of closely spaced cutting blades that divides vegetables into smaller, relatively uniform pieces when the pusher is pressed down. The grid determines the cut size, while the matching pusher forces food through the openings. Keep the grid clear, use the correct attachment, and never push food or remove trapped pieces with bare fingers.
A push-down chopper blade grid is the cutting component inside a manual vegetable chopper. It is designed to make repeated cuts in one downward movement, reducing the need to chop each piece individually with a kitchen knife.
The term can refer to the metal cutting grid, the complete blade-holder assembly, or the grid-shaped teeth on the pusher that move food through the blades. These parts work together, but they perform different jobs.
What Is a Push-Down Chopper Blade Grid?
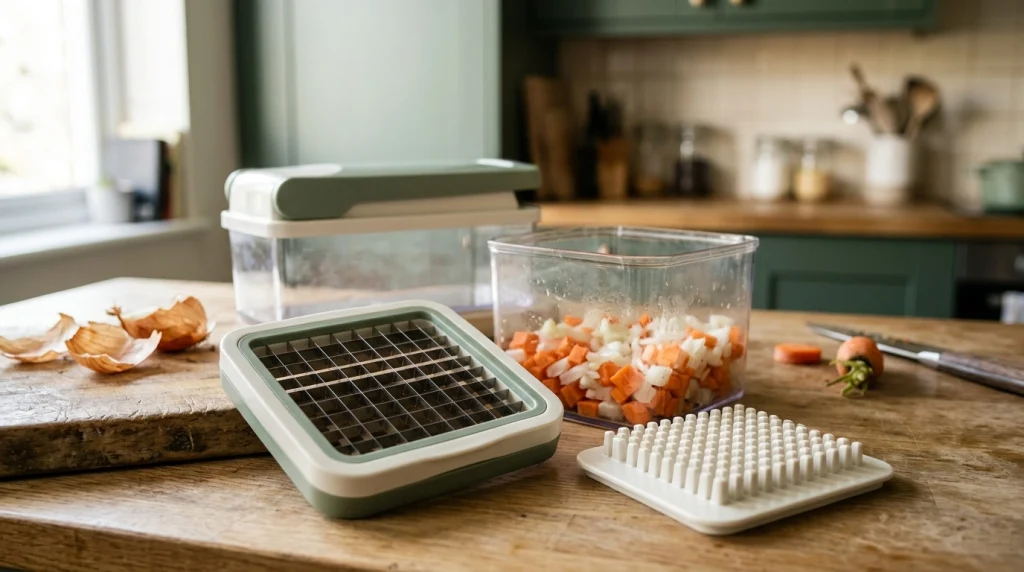
A push-down chopper blade grid is a fixed arrangement of sharp blades that cross or sit closely alongside one another to create multiple cutting openings. Depending on the attachment, the openings produce small cubes, larger dice, strips, or another specified cut.
In a typical countertop vegetable chopper, the grid sits in a frame above a collection container. A hinged lid or separate pusher presses the food through the cutting openings, allowing the pieces to fall into the container below.
The grid is not the same as a chopping blade that spins inside an electric food processor. It generally remains stationary during the cutting action; the downward force from the pusher moves the food through its edges.
The main parts and their jobs
- Cutting grid: The intersecting or parallel blade edges that divide the food.
- Blade frame: Holds the grid in position and provides a safer area to grip when the design allows it.
- Pusher or press plate: Applies downward force to move the food through the cutting edges.
- Collection container: Catches the chopped pieces and helps contain the mess.
- Hinge, guide, or locking mechanism: Helps the moving section travel along the intended path and remain properly aligned.
Not every chopper includes all these parts as separate components. Compact home models may combine the lid, pusher, and container into a simpler assembly.
How Does the Blade Grid Cut Vegetables?
The grid works by concentrating downward force along its sharp edges. As the pusher moves down, it drives the food against the grid and through its openings, separating it into smaller pieces.
- Prepare the ingredient. Wash it, remove unsuitable hard parts, and cut it into portions that fit the chopper’s opening.
- Position the food. Place it on the cutting area as directed by the manufacturer’s instructions, keeping fingers away from the blades.
- Align the pusher. Make sure the pusher and blade grid are compatible and properly seated.
- Press down evenly. Apply a controlled, firm movement without forcing the mechanism beyond its normal resistance.
- Collect the pieces. The chopped food passes into the container, ready for the next preparation step.
The grid’s geometry determines the approximate shape and dimensions of the cuts. The result also depends on the food’s size, firmness, orientation, and whether the cutting edges and pusher are correctly aligned.
For example, a firm onion cut into a suitable section can pass through a dicing grid more cleanly than an oversized piece that covers the cutting area unevenly. A tomato may need different handling because its soft flesh and slippery skin respond differently to pressure.
What Determines the Size of the Chopped Pieces?
The size of the grid openings is the main factor controlling the cut size, but the grid alone does not guarantee perfectly identical pieces.
- Grid spacing: Smaller openings generally produce smaller pieces; larger openings produce larger dice.
- Pusher compatibility: The pusher must fit the blade arrangement so its teeth or projections pass through the intended spaces.
- Ingredient dimensions: Food that is too large, irregular, or poorly positioned may not pass through cleanly.
- Food texture: Firm vegetables usually hold their shape better than very soft or overripe produce.
- Blade condition: Bent, damaged, or dull edges can interfere with smooth cutting.
Commercial push-down choppers illustrate why matching components matters. NEMCO’s Easy Chopper product information lists different cutting-grid sizes and corresponding push blocks for its equipment. Those dimensions are model-specific and should not be assumed to apply to a household chopper.
Why Does Food Get Stuck in a Push-Down Chopper Grid?
Food usually gets trapped when its texture, size, or shape makes it difficult to pass through the openings. Residue left from earlier use can also narrow the available space and make the next chopping session harder.
Common causes and practical fixes
- Oversized pieces: Cut the ingredient into portions that fit the cutting area before pressing.
- Very hard vegetables: Prepare them according to the manual rather than trying to force a large, dense piece through the grid.
- Soft or slippery produce: Position it carefully and use the method recommended for that ingredient. Very soft produce may crush instead of forming neat cubes.
- Fibrous skins and starchy residue: Rinse the grid promptly after use and clear remaining debris with the appropriate cleaning tool.
- Misaligned parts: Stop if the pusher does not line up with the grid. Check that the attachment is seated correctly before trying again.
- Damaged or dull edges: Stop using a grid that is bent, loose, cracked, or otherwise damaged. Replace it with a compatible part when necessary.
Warning
Never press harder just because the chopper has jammed. Stop, release the pressure, and follow the manufacturer’s instructions for opening and clearing the assembly. Do not reach through the grid or use a knife to pry out trapped food while the cutting component is being held in place.
How to Clean a Push-Down Chopper Blade Grid Safely
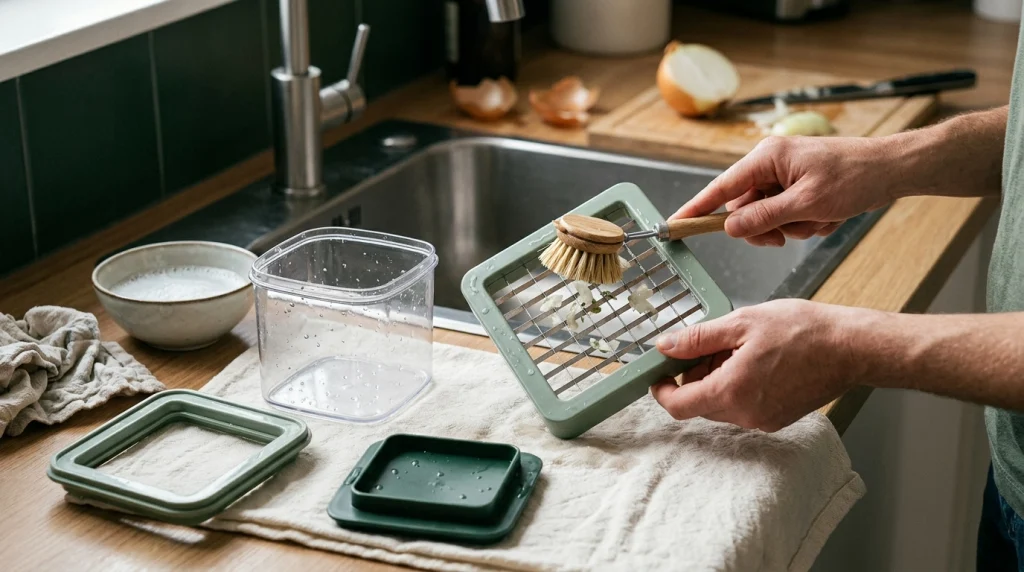
Clean the grid as soon as practical after use, before vegetable fibers, skins, or starch dry inside the openings. The correct procedure depends on whether the blade assembly is removable and whether the manufacturer permits dishwasher cleaning.
- Empty the container. Remove chopped food and clear the work area so loose blades or attachments cannot be hidden under dishes.
- Disassemble only as directed. If the grid is removable, release it using the designated tabs, handles, or locking mechanism. Do not force a part that does not come free normally.
- Rinse away loose food. Use running water to remove accessible residue while holding the assembly by its safe frame. Follow the manual’s directions for which side to rinse from.
- Brush the openings. Use the supplied cleaning tool or a suitable brush to remove trapped pieces without placing fingers against the cutting edges.
- Wash with mild detergent. Clean the removable parts using the method allowed by the manufacturer, avoiding abrasive materials that could damage the assembly.
- Rinse and inspect. Check the grid intersections, frame edges, and pusher teeth for remaining residue or damage.
- Dry and store safely. Let the components dry completely and store sharp attachments so their cutting edges cannot accidentally contact hands.
The official NEMCO Easy Chopper operating and maintenance manual describes removing the pusher and blade assembly for cleaning, washing the components, and checking compatibility between the push block and blade set. This is a useful example of model-specific care, not a universal disassembly procedure for every home chopper.
What should you avoid during cleaning?
- Do not run bare fingers along the cutting edges to check whether they are sharp.
- Do not leave a loose blade assembly hidden in a sink full of cloudy dishwater.
- Do not scrape the grid with a metal knife, screwdriver, or other improvised tool.
- Do not assume every blade, lid, or plastic container is dishwasher-safe.
- Do not reassemble wet parts and seal them away if moisture remains trapped inside.
If food has dried onto the grid, use a brief soak in warm, soapy water only if the manufacturer’s instructions allow it. Then use the approved brush or cleaning attachment rather than forcing the residue out with a sharp object.
How Can You Tell If the Blade Grid Needs Replacing?
A blade grid may need replacement if it is visibly damaged, no longer stays securely in its frame, or repeatedly produces poor cuts despite correct preparation and cleaning. A temporary jam does not automatically mean the blades are worn out.
Look for these warning signs:
- Blades that are bent, chipped, loose, or visibly out of alignment.
- A cracked holder or broken locking tab that allows the cutting attachment to move.
- A pusher that no longer meshes correctly with the grid.
- Persistent uneven cutting that remains after the food is prepared correctly and the parts are cleaned.
- Rust, corrosion, or other deterioration that affects the cutting surface or the attachment’s safe use.
Do not attempt to straighten or sharpen a complex grid unless the manufacturer specifically provides a safe, approved procedure. Some assemblies are designed for replacement rather than repair, and a damaged cutting pattern can make the tool unsafe.
How to Use the Grid Without Damaging It
Good technique reduces unnecessary strain on the cutting edges, pusher, and frame. A few habits are more useful than applying extra force when the tool resists.
- Place the chopper on a stable, level work surface before use.
- Prepare ingredients to fit the opening instead of pushing oversized pieces through.
- Use only the blade grid and pusher intended to work together.
- Keep hands clear of the cutting area during pressing and while removing attachments.
- Stop if the lid sticks, the pusher binds, or the frame shifts during operation.
- Clean the grid after each use and inspect it before the next session.
For broader ingredient-preparation techniques, see these practical cooking and meal-preparation tips. A chopper can speed up repetitive cutting, but preparing the ingredients correctly remains essential for consistent results.
Frequently Asked Questions
Is a push-down chopper blade grid the same as a slicer blade?
No. A dicing grid usually divides food into pieces through a series of openings, while a slicer blade generally creates slices. Some choppers accept interchangeable attachments, so the exact function depends on the design.
Why does my chopper leave some vegetables partly uncut?
The food may be too large, too soft, poorly positioned, or unsuitable for the selected grid. Check alignment, prepare smaller portions, and inspect the attachment for damage rather than forcing the pusher down.
Can I put the blade grid in the dishwasher?
Only if the manufacturer’s instructions say that the specific grid and its frame are dishwasher-safe. A removable metal grid, plastic holder, and complete lid may have different cleaning requirements.
Can I use the chopper if one blade is bent?
No. A bent or loose blade can interfere with cutting and may create an additional injury risk. Stop using the attachment and replace it with a compatible part approved for your model.
How often should I clean the blade grid?
Clean it after every use, preferably before food residue dries. Prompt cleaning helps prevent buildup from blocking the openings and makes inspection easier.
Can I sharpen a push-down chopper grid at home?
Do not assume it can be sharpened safely. Closely spaced blades can be difficult to handle and realign, so follow the manufacturer’s maintenance instructions and replace the grid if sharpening is not an approved service option.
Conclusion
A push-down chopper blade grid creates uniform cuts by directing food through a fixed arrangement of sharp edges. Its performance depends on choosing the right grid, preparing ingredients to fit, keeping the pusher aligned, and cleaning away trapped food after use.
If the chopper jams, stop and clear it according to the manufacturer’s instructions rather than applying more force. Inspect the blade assembly regularly, replace damaged parts with compatible components, and store the grid securely. These simple habits help keep the tool useful while reducing the risk of cuts or damage.
Related Product
Vegetable Chopper Cleaning Brush
A suitable cleaning brush can help remove trapped vegetable pieces from narrow blade-grid openings without putting fingers against the cutting edges.
As an Amazon Associate, we earn from qualifying purchases.
Place the product box above immediately before the article’s “Frequently Asked Questions” heading.