
How to Make a Homemade Dish Rack

Quick Answer
To make a homemade dish rack, build a slotted frame from hardwood dowels and two wooden side rails. Measure your dishes, drill evenly spaced holes, glue the dowels in place, and add a waterproof drain tray underneath. Before cutting anything, use this standard dish rack size guide to choose a practical footprint.
Quick Building Steps
- Measure the space: Check your counter, sink, faucet, and cabinet clearance.
- Cut two rails: Make matching hardwood side rails about 16 inches long.
- Mark the slots: Space dowel centers about 1½ inches apart for dinner plates.
- Drill matching holes: Use a depth stop so every hole is even.
- Glue and assemble: Insert hardwood dowels with waterproof wood glue.
- Sand and protect: Smooth the rack and apply a water-resistant, food-contact-appropriate finish.
One Important Tip
- Angle or position the drain tray toward the sink so water cannot pool beneath the rack.
I made my first homemade rack after a store-bought model blocked half my small counter. The project looked simple, but drainage and plate spacing mattered more than decoration.
This guide shows you a practical wooden design using common tools. You’ll also learn how to size, seal, clean, and modify it safely.
What Is a Homemade Dish Rack?
A homemade dish rack is a ventilated frame that separates washed dishes while water drains and air circulates. It may sit beside the sink, span the basin, or rest inside a drain tray.
The easiest durable version uses two wooden rails connected by parallel dowels. The gaps hold plates upright, while the dowels provide space for cups and bowls.
- Side rails: Support the rack and keep it stable.
- Horizontal dowels: Form the base beneath the dishes.
- Vertical dowels: Separate plates and stop them from sliding.
- Drain tray: Catches water and directs it toward the sink.
- Protective finish: Reduces water absorption and staining.
This design is easier to customize than a complicated two-tier rack. It also avoids enclosed corners where water and residue collect.
What Materials Do You Need to Make a Wooden Dish Rack?
Choose straight, dense hardwood without cracks, chemical treatment, or a strong odor. Maple, beech, white oak, and teak tolerate kitchen use better than soft construction lumber.
Avoid pressure-treated wood, reclaimed painted wood, and unidentified pallets. Those materials may contain preservatives, old coatings, oil, or other contaminants.
Materials
- Two hardwood rails measuring approximately ¾ × 1½ × 16 inches
- Ten to twelve ⅜-inch hardwood dowels for the base
- Twelve to sixteen ¼-inch dowels for plate dividers
- Water-resistant wood glue suitable for kitchen projects
- 120-, 180-, and 220-grit sandpaper
- A removable plastic, silicone, or stainless-steel drain tray
- Rubber feet or silicone bumpers
- A water-resistant finish labeled for its intended use
Tools
- Tape measure and sharp pencil
- Combination square
- Saw and cutting guide
- Drill or drill press
- ⅜-inch and ¼-inch drill bits
- Drill-bit depth stop or masking-tape depth marker
- Clamps
- Rubber mallet
- Safety glasses and dust mask
A drill press produces the straightest holes. However, a handheld drill works if you use a square drilling guide and practice on scrap wood.
How Big Should You Make the Rack?
Your available drying area should determine the dimensions. Measure the clear counter space, distance to the sink, faucet movement, and cabinet height.
For a compact homemade rack, I like a footprint near 16 × 12 inches. It holds several dinner plates without permanently taking over the worktop.
If you need more capacity, review the site’s detailed dish rack dimensions and fitting guide. Remember that a drainboard or utensil cup can extend beyond the wooden frame.
| Rack Size | Suggested Footprint | Approximate Capacity | Best Use |
|---|---|---|---|
| Mini | 12 × 10 inches | 4–5 plates and 2 cups | RVs or one-person kitchens |
| Compact | 16 × 12 inches | 6–8 plates and 4 cups | Apartments and small counters |
| Full-size | 20 × 15 inches | 8–10 plates, bowls, and cups | Daily family washing |
These capacities are planning estimates, not guarantees. Plate thickness, bowl shape, and slot spacing change what the finished rack can hold.
How Do You Make a Homemade Dish Rack Step by Step?
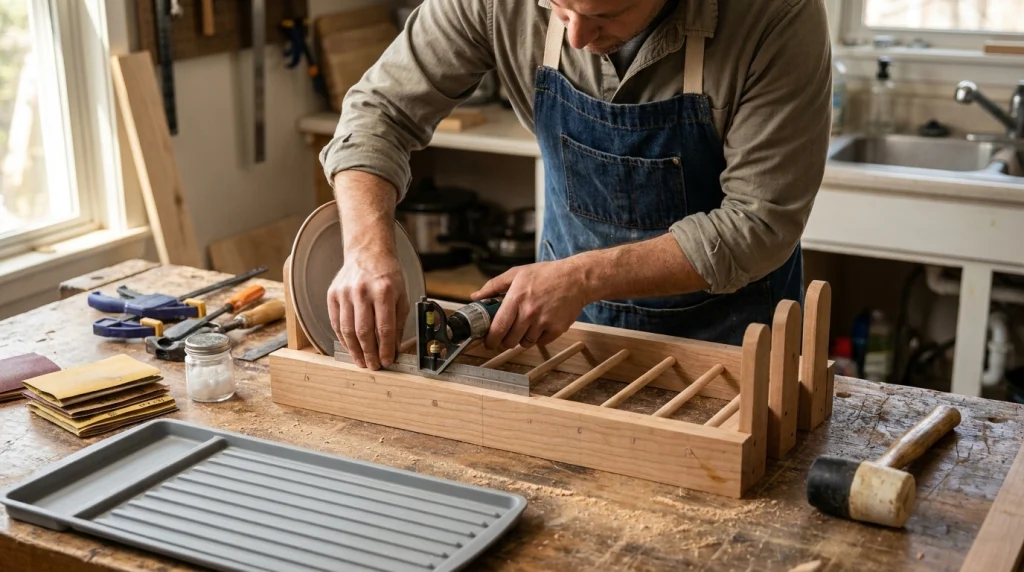
Start with a simple plan and test every measurement on scrap wood. A small spacing error repeated across ten holes can twist the entire assembly.
1. Measure Your Plates and Drying Area
Measure your largest everyday dinner plate across its rim and near its base. Thick stoneware usually needs wider spacing than thin porcelain.
Place two plates upright and measure a comfortable gap between their centers. About 1½ inches works for many plates, but test yours before drilling.
- Counter footprint: Leave room to wipe around the rack.
- Sink access: Keep the faucet handle and sprayer unobstructed.
- Plate height: Check clearance beneath cabinets or shelves.
- Drainage path: Ensure the tray can empty toward the basin.
2. Cut and Match the Side Rails
Cut two rails to the same length. For the compact design, each rail should measure about 16 inches.
Clamp the pieces together and square their ends. Matching rails prevent the dowels from pulling the finished rack out of alignment.
3. Mark the Base-Dowel Holes
Draw a centerline along each rail. Mark matching hole centers every 1½ inches, leaving equal space at both ends.
Number the matching marks lightly with a pencil. This small step helped me avoid drilling one rail in reverse during my first attempt.
4. Drill Straight, Consistent Holes
Drill ⅜-inch holes for the base dowels. Make each hole roughly half the rail’s thickness, rather than drilling completely through it.
Use a depth stop so every socket is equal. Wear eye protection and secure the wood with clamps before drilling.
The Consumer Product Safety Commission’s safety resources provide broader guidance for safer household projects and product use.
5. Cut and Dry-Fit the Dowels
Cut the base dowels to your planned rack width. A 12-inch dowel span creates a useful compact rack.
Insert every dowel without glue first. The frame should sit flat without forcing either rail outward.
- Trim any dowel that prevents the rails from sitting parallel.
- Redrill shallow or crooked sockets before assembly.
- Replace split dowels instead of trying to hide the damage.
- Round exposed ends and corners with sandpaper.
6. Add Upright Plate Dividers
Drill ¼-inch vertical holes into selected base dowels or into a separate lower support rail. Insert paired upright dowels approximately four to five inches tall.
The pairs should support plates without pinching their rims. Test the spacing with your heaviest plate before gluing the dividers.
7. Glue and Clamp the Frame
Apply a small amount of water-resistant glue inside each socket. Too much glue creates hardened ridges that trap residue.
Assemble the frame on a flat surface and check both diagonals. Equal diagonal measurements indicate that the frame is square.
- Glue the dowels into the first side rail.
- Align the second rail with the exposed dowel ends.
- Tap the rail gently with a rubber mallet.
- Check the frame for square.
- Clamp it according to the glue manufacturer’s directions.
- Remove squeezed-out glue before it hardens.
8. Sand and Apply a Protective Finish
Sand the dry assembly with 120 grit, followed by 180 and 220 grit. Pay close attention to dowel joints and places that hands will touch.
Choose a finish whose label supports your intended kitchen use. Follow its complete curing time, since a surface may feel dry before the coating has fully cured.
For information about substances intended for food-contact applications, consult the FDA’s food-contact substances overview. A dish rack normally touches cleaned tableware rather than food, but careful material selection still makes sense.
9. Add Feet and a Removable Drain Tray
Attach four silicone bumpers beneath the rails. The slight lift improves airflow and prevents wet wood from sitting directly on the counter.
Place a washable drain tray underneath. A ridged tray with a sloped surface or movable spout handles water better than a flat board.
Which Homemade Dish Rack Material Works Best?
Hardwood is the easiest material for a basic home workshop. Stainless steel lasts longer around water, but cutting and joining it requires specialized tools.
| Material | Main Advantage | Main Drawback | DIY Difficulty |
|---|---|---|---|
| Maple or beech | Easy to cut and attractive | Needs drying and maintenance | Easy |
| Teak | Naturally handles moisture well | Costs more and can dull tools | Moderate |
| PVC pipe | Inexpensive and water-resistant | Bulky appearance and many joints | Easy |
| Stainless steel | Durable and corrosion-resistant | Harder to fabricate at home | Advanced |
If moisture resistance is your top concern, compare these choices in the guide to dish rack materials that resist rust. For most beginners, sealed maple or beech offers the best balance of cost and workability.
How Can You Improve Drainage and Airflow?
Good drainage matters as much as strong joinery. Standing water can stain countertops, soften wooden joints, and encourage unpleasant odors.
- Raise the frame: Use rubber feet to create an air gap underneath.
- Slope the tray: Direct runoff toward the sink instead of the backsplash.
- Leave open space: Avoid solid side panels that block airflow.
- Separate dishes: Keep plates from touching so both surfaces can dry.
- Remove the tray: Wash and dry it before residue accumulates.
I initially used a flat baking sheet beneath my prototype. Water pooled in the corners, so I replaced it with a ridged tray angled slightly toward the basin.
If you cannot provide reliable drainage, consider these methods for drying dishes without a rack. A clean absorbent mat may work better than a poorly drained DIY frame.
How Do You Clean a Homemade Wooden Dish Rack?
Remove the dishes and tray each day, then let the rack dry completely. Wipe visible water rather than leaving the wood damp overnight.
Wash the rack with mild dish soap and a soft cloth when residue appears. Avoid long soaking, harsh scouring, and placing a glued wooden rack in the dishwasher.
- Inspect joints for darkening, movement, or trapped residue.
- Clean the removable tray more often than the wooden frame.
- Dry every surface before returning the rack to the counter.
- Repair damaged finish before water penetrates exposed wood.
- Discard a rack with persistent mold, deep cracks, or failing joints.
The USDA’s food-safety basics emphasize clean handling and surfaces in the kitchen. Your drying setup should support those habits, not create another damp cleaning problem.
Common Homemade Dish Rack Mistakes
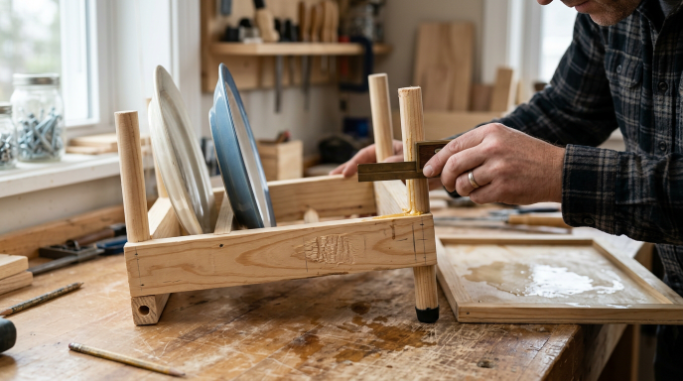
The most common mistake is building from guessed dimensions. Measure your plates and kitchen before choosing a plan from someone else’s counter.
- Slots are too narrow: Thick plates will bind or chip at the rim.
- Slots are too wide: Plates lean heavily and reduce capacity.
- Holes are misaligned: The frame twists and rocks on the counter.
- Wood is untreated: Repeated wetting raises the grain and stains it.
- Finish is unsuitable: Unknown coatings may peel or remain tacky.
- No drainage slope: Water stays beneath the rack.
- Feet are missing: The lower rails remain damp for longer.
- Joints are over-glued: Dried squeeze-out creates hard-to-clean edges.
Load-test the finished rack over a towel before daily use. Add one plate at a time and check for spreading rails, loose dowels, or tipping.
Useful Products for Building or Upgrading Your Rack
If you’re ready to build one, these are the practical supplies I would start with:
🏆 Best for Accurate Assembly
Milescraft DrillBlock Handheld Drill Guide
★★★★☆
Its guide holes help keep a handheld drill perpendicular to the wood. I would use it when a drill press is unavailable because straight dowel sockets make assembly much easier.
💧 Best for Drainage
OXO Good Grips Silicone Drying Mat
★★★★☆
Raised ribs keep the wooden frame away from pooled water and improve airflow. I like a removable mat because it can be washed separately and stored when the rack is unused.
🛠️ Best for Secure Joints
Titebond III Ultimate Wood Glue
★★★★½
This water-resistant woodworking glue suits projects exposed to occasional moisture. I would still keep finished joints out of standing water and follow the label’s clamping and curing instructions.
Frequently Asked Questions
Can I make a dish rack from PVC pipe?
Yes. Cut small-diameter PVC into matching rails and supports, then connect the pieces with appropriate fittings. Smooth every cut edge and design the frame for easy cleaning. Use new material, not pipe that previously carried unknown substances.
What wood is best for a homemade dish rack?
Maple, beech, white oak, and teak are practical choices because they are stronger and more moisture-tolerant than many softwoods. Use clean, untreated lumber and protect it with a finish suitable for the rack’s intended kitchen use.
How far apart should dish rack dowels be?
A center-to-center distance near 1½ inches works for many dinner plates. Thick stoneware may need more room. Test the proposed spacing with two actual plates before drilling the finished side rails.
Can I leave a wooden dish rack unfinished?
You can, but unfinished wood absorbs water, raises its grain, and stains more easily. A properly selected and fully cured protective finish improves moisture resistance. The rack must still drain well and dry between uses.
How do I stop a homemade dish rack from molding?
Use an open design, elevate it with rubber feet, and remove standing water promptly. Clean the rack gently and let it dry completely each day. Replace it if mold penetrates cracks or returns after careful cleaning.
Build for Your Dishes, Not Someone Else’s
A successful homemade dish rack does three things well: it supports your dishes, drains toward the sink, and dries completely. Decorative details should come after those basics.
Measure twice, test the slot spacing, and dry-fit every joint before using glue. That extra preparation produces a sturdier rack that feels made for your kitchen—because it is.