
How to Make Your Own Kitchen Shelves: Easy DIY Guide

Quick Answer
To make your own kitchen shelves, measure the wall, choose a straight 3/4-inch board, locate secure mounting points, install level brackets or cleats, and fasten the shelf to its supports. For a lower-cost version, see my guide to the cheapest way to make shelves before buying new materials.
Quick Kitchen Shelf Steps
- Measure first: Check shelf width, depth, ceiling clearance, and space around cabinets or appliances.
- Choose the board: Use straight solid wood or quality plywood suited to the expected load.
- Find support: Locate wall studs when possible and mark them before positioning brackets.
- Mark it level: Draw a level reference line so every support sits at the same height.
- Secure the shelf: Fasten the brackets firmly, then attach the board so it cannot slide or tip.
- Finish for kitchens: Seal exposed wood and edges where moisture or frequent wiping is likely.
One Rule I Wouldn’t Skip
- Match the board, brackets, fasteners, wall structure, and expected load rather than relying on one universal shelf-weight number.
Making kitchen shelves is one of the simplest ways to gain useful storage without installing another cabinet. I like the project because the dimensions can follow your dishes, jars, mugs, and available wall space instead of a standard furniture size.
A basic bracket shelf is also beginner-friendly. The important part isn’t complicated joinery; it’s careful measuring, solid support, and choosing materials that make sense in a busy kitchen.
What Is a Homemade Kitchen Shelf?
A homemade kitchen shelf is a horizontal storage surface you cut, finish, and mount to suit a specific kitchen space. Most simple versions use a wood or plywood board supported by metal brackets, wooden cleats, or concealed floating hardware.
Definition: A wall-mounted kitchen shelf is a shelf board secured to structural supports so it can hold kitchen items above the counter or floor.
- Open shelves: Best for plates, bowls, mugs, jars, and frequently used ingredients.
- Bracket shelves: Easy to build, easy to reinforce, and suitable for many beginners.
- Cleat-supported shelves: Useful inside alcoves, pantries, or between cabinet sides.
- Floating shelves: Hide most mounting hardware but usually require more precise installation.
- Drying shelves: Need extra planning for drainage, airflow, and moisture exposure.
If wet dishes are the main problem, an ordinary storage shelf may not be the best design. A purpose-built homemade dish rack gives water somewhere to drain while keeping plates separated.
What Materials Do You Need to Make Kitchen Shelves?
For a straightforward shelf, start with a 3/4-inch solid-wood board or quality plywood. Both are easy to cut and finish, while the correct span still depends on the load and support arrangement.
WOOD Magazine’s shelf testing found that material choice, span, and front-edge reinforcement can make a noticeable difference in sag. Its shelf-making guide is useful when planning longer or heavily loaded shelves.
Basic Material List
- 3/4-inch solid pine, hardwood, or quality plywood shelf board
- Two or more appropriately rated shelf brackets
- Screws or fasteners approved for the brackets and wall type
- Wall anchors when required by the mounting system
- 120- and 220-grit sandpaper
- Paint, stain, or a suitable protective wood finish
- Optional edge banding for exposed plywood edges
Tools You’ll Need
- Tape measure
- Pencil
- Stud finder
- Carpenter’s level
- Combination or speed square
- Drill/driver and suitable bits
- Circular saw, miter saw, or another suitable cutting tool
- Clamps
- Eye protection
Use tools that are in sound condition and follow their instructions. OSHA’s hand and power tool guidance also stresses proper tool condition and correct use.
Which Kitchen Shelf Material Works Best?
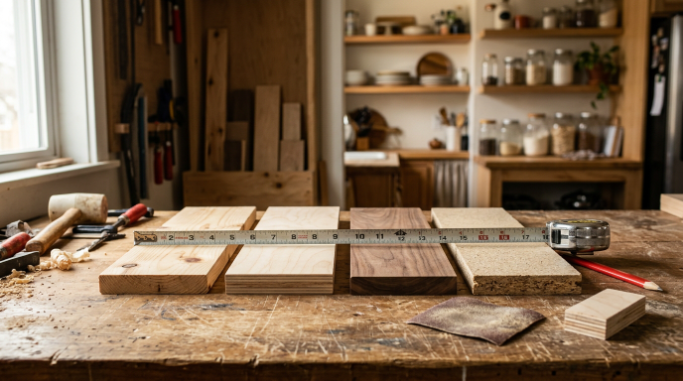
For most DIY kitchens, I would start with solid pine for an easy painted shelf or plywood for a stable, efficient use of material. Particleboard can work in dry areas, but exposed edges are a poor match for repeated sink-side moisture.
| Material | Practical Thickness | Main Advantage | Best Kitchen Use | Main Caution |
|---|---|---|---|---|
| Solid pine | About 3/4 inch | Easy to cut, sand, stain, or paint | Visible open shelves | Reject warped or heavily knotted boards |
| Quality plywood | About 3/4 inch | Stable and efficient for multiple shelves | Pantries and long shelf runs | Exposed layers usually need edging |
| Hardwood | About 3/4 inch or thicker | Durable, attractive finished surface | Decorative dish and mug shelves | Higher material cost |
| Particleboard | About 5/8–3/4 inch | Low initial cost | Light, dry storage | Moisture and longer spans can cause problems |
How Deep Should Homemade Kitchen Shelves Be?
An 8-to-12-inch depth works well for many open kitchen shelves because it accommodates dishes, mugs, pantry jars, and small serving pieces without projecting too far into the room. Measure your own items before cutting anything.
My favorite planning trick is simple: place the largest everyday plate or jar on a table and measure its footprint. Then add only the clearance you need instead of automatically building a deep shelf.
- 6–8 inches: Useful for spices, glasses, mugs, and small containers.
- 8–10 inches: A practical range for many plates, bowls, and pantry jars.
- 10–12 inches: Better for larger dinnerware and serving pieces.
- Over 12 inches: Adds storage but also increases projection and leverage on the supports.
If dishes will be the main contents, plan their positions before deciding the final depth. My guide to arranging dishes on shelves explains how weight, frequency of use, and stack height affect the layout.
How Do You Make Kitchen Shelves Step by Step?
The easiest method is a straight shelf board on visible metal brackets. Dry-fit the layout before drilling so you can change the height, spacing, or shelf depth without patching unnecessary holes.
1. Measure the Wall and Plan the Shelf
Measure the available width and decide what will live on the shelf. Check cabinet doors, appliance lids, faucets, windows, switches, and other nearby features.
Mark the proposed shelf height with removable painter’s tape. This gives you a quick visual check before installation becomes permanent.
2. Locate the Wall Studs
Use a stud finder to identify framing behind drywall and verify your marks carefully. Whenever the layout allows, I prefer to put load-bearing brackets into studs rather than asking drywall alone to support stacked dishes.
The Home Depot’s shelving-bracket installation guide recommends finding studs first and notes that suitable wall anchors may be needed where framing is unavailable.
3. Cut the Shelf Board
Mark the cut with a square so the line is perpendicular to the board’s edge. Clamp the material securely and support both sides of the cut.
After cutting, check the board against the wall. Correcting a small length error now is much easier than after finishing.
4. Sand the Wood
Start around 120 grit to remove milling marks and rough edges, then move to about 220 grit for a smoother finished surface. Lightly ease sharp corners rather than leaving knife-like edges.
Remove sanding dust before applying paint, stain, or another finish. Pay extra attention to plywood edges because exposed layers can look unfinished.
5. Mark a Level Support Line
Draw a light pencil line or use painter’s tape as a guide. Check it with a level before marking any screw holes.
Lowe’s recommends aligning shelving support with wall studs where possible, and common layouts often follow stud positions. Its simple wall-shelf guide is a useful reference for basic planning.
6. Install the Brackets
Hold each bracket on the level line and mark the mounting holes. Drill suitable pilot holes, then fasten the brackets using hardware appropriate for the wall and bracket system.
Home Depot advises spacing brackets no more than 24 inches apart for many light-to-medium bracketed shelf applications. Heavier loads, deeper shelves, weaker materials, or specific hardware may require closer support.
7. Attach the Shelf Board
Place the board on the brackets and center it before fastening. If the brackets include holes for securing the shelf from underneath, use screws short enough that they cannot break through the top surface.
Check the level again after tightening. Correct any movement before adding dishes or pantry goods.
8. Finish and Let It Cure
Apply a finish suited to the wood and the kitchen environment. Follow the product label for coat intervals, drying time, and full curing time.
A surface can feel dry before the finish has completely cured. I wait for the stated cure period before loading freshly finished shelves with dishes or containers.
How Far Apart Should Kitchen Shelf Brackets Be?
Bracket spacing depends on the shelf material, thickness, depth, fasteners, wall, and expected load. For many light-to-medium wall shelves, keeping supports within 24 inches is a useful starting point, but the bracket manufacturer’s instructions should take priority.
| Support Method | Planning Approach | Good For | Main Tradeoff |
|---|---|---|---|
| Stud-mounted brackets | Follow stud locations; add supports as required | Dishes, jars, everyday storage | Bracket positions may be dictated by framing |
| Appropriate wall anchors | Follow the anchor maker’s load and installation instructions | Locations without usable studs | Capacity varies greatly by wall and anchor |
| Wood cleats | Use continuous rear or side support where suitable | Pantries, alcoves, cabinet interiors | Supports remain visible below the shelf |
| Floating hardware | Follow the specific manufacturer’s layout exactly | Minimal, decorative shelving | Less forgiving installation |
Don’t assume two brackets automatically support every board. If a shelf is long, deep, thin, or intended for heavy stacks, another support can reduce the unsupported span.
Can You Turn Kitchen Shelves Into a Dish-Drying Area?
Yes, but wet-dish storage needs more than an ordinary painted board. You need airflow, drainage, corrosion-resistant or sealed materials, and a way to prevent water from sitting against the wall or shelf.
- Keep dishes separated: Air should move around plates and bowls.
- Control runoff: Use a removable tray, draining surface, or design that directs water toward the sink.
- Protect wood: Don’t leave unfinished timber exposed to repeated standing water.
- Make cleaning easy: Removable racks and trays are easier to wash than permanent narrow crevices.
- Check wall protection: Repeated splashes can damage vulnerable wall finishes.
Wall-mounted drying racks are only one option. This guide to the different types of dish racks compares wall-mounted, countertop, over-sink, foldable, and other designs.
What Mistakes Should You Avoid When Building Kitchen Shelves?
The most expensive DIY shelf mistake is usually not the board. It’s installing a good board on inadequate supports or discovering too late that the shelf interferes with normal kitchen movement.
- Skipping stud checks: Don’t assume a screw has entered framing because it feels tight.
- Ignoring the expected load: Plates and jars become surprisingly heavy when several are grouped together.
- Using warped lumber: A twisted board makes bracket alignment frustrating.
- Making shelves too deep: Extra depth increases projection and encourages clutter.
- Guessing fasteners: Use hardware suited to the bracket, substrate, and load.
- Skipping moisture protection: Kitchen steam and sink splashes are harder on raw edges than a dry bedroom environment.
- Forgetting to secure the board: A shelf should not be able to slide forward off its supports.
- Overloading after installation: Add contents gradually while watching for movement or sag.
Also consider what may be hidden behind the wall before drilling, especially around sinks and appliances. If you’re unsure about electrical wiring, plumbing, or the wall’s construction, get appropriate professional help before making holes.
My Simple Kitchen Shelf Plan for 2026
For a straightforward everyday kitchen, I would build a 3/4-inch shelf about 8 to 10 inches deep and keep the length matched to secure support points. That depth handles many mugs, bowls, jars, and plates without turning the shelf into a bulky ledge.
For example, a 36-inch shelf intended for everyday dishes gets more reassurance from three well-positioned supports than from stretching the board across a large unsupported span. I would rather see one extra bracket than a shelf that slowly develops a visible dip.
- Measure the largest item the shelf must hold.
- Choose the shelf depth from that measurement.
- Locate studs or another suitable structural mounting method.
- Choose brackets rated for the intended application.
- Cut and finish a straight 3/4-inch board.
- Install the supports on a level reference line.
- Fasten the board to the brackets.
- Add stored items gradually and inspect the shelf for movement.
If you’re ready to build, these are three tools I’d prioritize for a simple bracket-shelf project:
🏆 Best Essential Tool
BLACK+DECKER 20V MAX Cordless Drill/Driver
★★★★★
A compact cordless drill covers pilot holes, bracket screws, and most light DIY fastening work. I like a smaller drill for kitchen shelves because it’s easier to control near cabinets and backsplashes.
🧱 Best for Wall Layout
Zircon StudSensor e50
★★★★☆
This electronic stud finder is designed to help locate stud edges behind common wall surfaces. I treat it as a locating aid and verify readings carefully before trusting a shelf to the marked position.
📐 Best for Accurate Marks
Swanson Tool 8-Inch Speed Square
★★★★☆
An 8-inch square makes straight cut lines and repeatable measurements easier on common shelf boards. I also find the rigid edge handy for checking marks before committing to a cut.
Frequently Asked Questions
Can a beginner make kitchen shelves?
Yes. A basic shelf made from one straight board and visible brackets is a beginner-friendly DIY project if you can measure, drill pilot holes, use a level, and identify suitable wall supports. Start with one short shelf before attempting a long run or concealed floating installation.
What wood is best for homemade kitchen shelves?
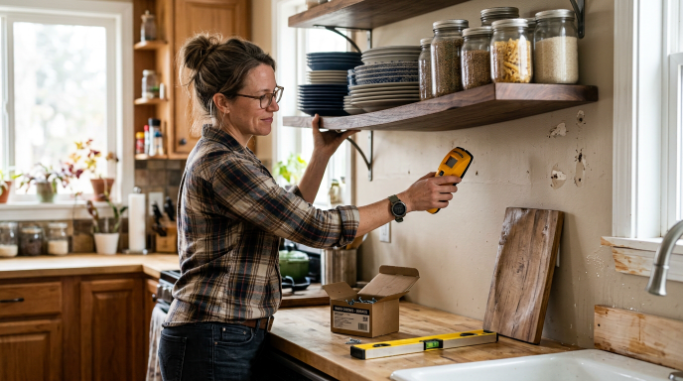
Solid pine and 3/4-inch plywood are practical choices for many DIY shelves. Pine is easy to finish and attractive when left visible, while plywood is stable and economical when cutting several shelves from one sheet. Hardwood works well when appearance and durability justify the extra cost.
How thick should kitchen shelves be?
A 3/4-inch board is a useful starting point for many household kitchen shelves, but thickness alone doesn’t determine capacity. Material type, shelf depth, unsupported span, bracket strength, fasteners, wall construction, and stored weight all influence how a finished shelf performs.
Can I put plates and bowls on open kitchen shelves?
Yes. Use stable shelves with adequate structural support, then keep heavier dishes where they’re easy to reach and unlikely to fall. Avoid excessively tall stacks, and check the shelf periodically for loose hardware, movement, cracking, or visible sag.
Can kitchen shelves be installed without drilling into studs?
Sometimes, but the correct solution depends on the wall and expected load. Properly selected anchors can support some shelving systems when studs aren’t available, but their ratings and installation requirements vary. Follow the anchor and bracket manufacturer’s instructions rather than treating all drywall anchors as interchangeable.
Final Takeaway
Making your own kitchen shelves comes down to five things: accurate measurements, a straight shelf board, appropriate supports, secure fasteners, and a finish suited to the kitchen. Get those fundamentals right before worrying about decorative details.
Start with one modest shelf and load it carefully. Once the height, depth, and support method work in your kitchen, you can repeat the same proportions for a coordinated set of useful open storage.