Easy Dal Recipe – Simple, Flavorful Indian Comfort Food Method
You already know dal as comfort food, but you may not know how simple it can be for weeknight cooking. I make a fast, forgiving dal that comes together with just a few pantry staples, and Emma Reed helped shape the version I use. This easy dal gives you a warm, protein-rich meal in under 30 minutes with minimal fuss.
I walk you through the exact ingredients, quick techniques, and small tricks that keep the dal flavorful every time. Follow along and you’ll have a reliable dish you can make any night, pack for lunch, or stretch into extra meals for the week.
Key Takeaways
- You can cook a tasty, nutritious dal quickly with simple pantry ingredients.
- Small technique tweaks keep the flavor consistent and let you adapt tastes.
- Dal stores and reheats well, making it great for meal prep and leftovers.
Why Dal Is Perfect for Everyday Meals
I turn to dal often because it gives reliable nutrition, stretches my food budget, and adapts to whatever I have in the pantry. It cooks quickly, stores well, and pairs with many sides.
Nutritional Value of Dal
I rely on dal for steady plant-based protein and fiber. A single cup of cooked lentils or split peas typically provides about 15–18 grams of protein and 15 grams of fiber, which helps keep me full and supports digestion. Dal also supplies iron, folate, potassium, and B vitamins—nutrients I might otherwise miss on a vegetarian meal plan.
The low fat and high nutrient density make dal a good option for everyday eating. For better iron absorption, I add a squeeze of lemon or serve dal with vitamin C–rich vegetables. For more details on lentil nutrition, the USDA FoodData Central is a helpful resource.
Budget-Friendly and Accessible Ingredients
I find dal one of the cheapest complete meals I can make. Dried lentils, split peas, and pigeon peas cost pennies per serving and last long in my pantry without refrigeration. Spices like turmeric, cumin, and mustard seeds are modest investments; a small jar lasts many meals.
Using dried pulses saves more money than canned options. Bulk bins or ethnic grocery stores often offer the lowest prices. I also use leftover vegetables or frozen greens to add volume and nutrients with no extra cost.
Versatility in Meal Planning
Dal fits morning, noon, or night in my meal plan. I make a simple yellow dal for a quick weeknight dinner, then transform leftovers into dal soup or a spiced stew for lunch the next day. It pairs well with rice, flatbreads, roasted vegetables, or a side salad.
I can vary texture and flavor by switching pulses (toor, moong, masoor), changing the tempering spices, or adding coconut milk, tomatoes, or greens. For recipe ideas and variations, I check trusted cooking sites like the Food Network for inspiration and technique tips.
Essential Ingredients for an Easy Dal Recipe
I focus on lentil choice, a short spice list, and a few optional add-ins that lift flavor without extra work. These items make dal simple, nutritious, and flexible for weeknight meals.
Choosing the Right Type of Lentils
I prefer red split lentils (masoor dal) or yellow split pigeon peas (toor/arhar dal) for quick, creamy results. Red lentils cook in 15–20 minutes and break down into a smooth texture without pre-soaking. Toor dal takes a bit longer and holds a bit more shape, giving a slightly firmer bite.
If you want a nuttier texture, use moong dal (split yellow mung beans). Brown or green lentils work too but need more cooking time and won’t turn as silky. For consistent results, rinse lentils until the water runs clear and remove any stones or debris.
Cooking tip: add 2–3 cups water per cup of lentils for a medium-thin dal. I often use a pressure cooker or Instant Pot to speed the process and lock in flavor.
Must-Have Spices and Aromatics
I keep the spice list short: turmeric, cumin, and salt form the base. Turmeric gives color and mild earthiness. Cumin seeds toasted in oil at the start add warm, nutty depth.
Onion, garlic, and fresh ginger are my go-to aromatics. Finely chopped onion sweats until soft, then I add garlic and ginger for a bright background flavor. A simple tadka (tempering) of mustard seeds, cumin, and a pinch of asafoetida or red chili finished in hot oil creates a burst of fragrance just before serving.
For reliable guidance on spice handling and safety, I often check resources like the USDA or a cooking reference such as Serious Eats.
Optional Add-Ins for Extra Flavor
I add tomatoes or coconut milk when I want a tangy or creamy twist. One chopped tomato per cup of lentils brightens the dal; coconut milk (¼–½ cup) makes it rich without dairy. Fresh cilantro, chopped green chilies, or a squeeze of lemon at the end lift the final bowl.
For heartier meals, I stir in cooked spinach, kale, or roasted vegetables. You can also add cooked potatoes or carrots for bulk. If you like smoky flavor, a small piece of smoked paprika or a charred tomato in the tadka works well.
Experiment with one or two add-ins at a time so the core dal flavor stays balanced. For technique details and variations, I consult authoritative guides like BBC Good Food.
Step-by-Step Guide to Making Dal
I will walk you through the key actions: how to prep and soak lentils, two cooking methods, and the final spice tempering that adds big flavor. Follow small, clear steps to get creamy, well-seasoned dal every time.
Preparation and Soaking Tips
I rinse lentils under cold water until the rinse runs clear. This removes dust and excess starch so the dal cooks evenly.
For split red or yellow lentils I skip long soaking; 10–20 minutes helps, but it’s not required. For whole lentils or toor (pigeon pea), I soak 30 minutes to 2 hours to cut cook time and improve digestibility.
Measure water as you cook: start with about 3 cups water per 1 cup split lentils for a medium-thick dal. Add 1/2 teaspoon turmeric and a pinch of salt to the pot before cooking to help color and flavor.
Keep aromatics ready: chopped onion, garlic, ginger, and fresh tomato if using. Toast whole spices like cumin or mustard seeds briefly in oil to wake their flavor.
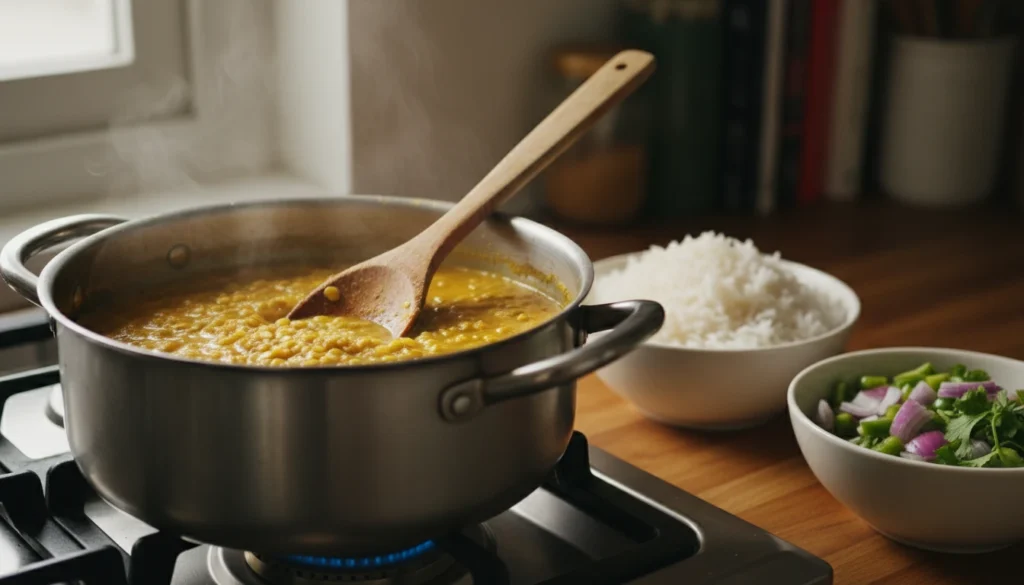
Cooking Dal on the Stovetop
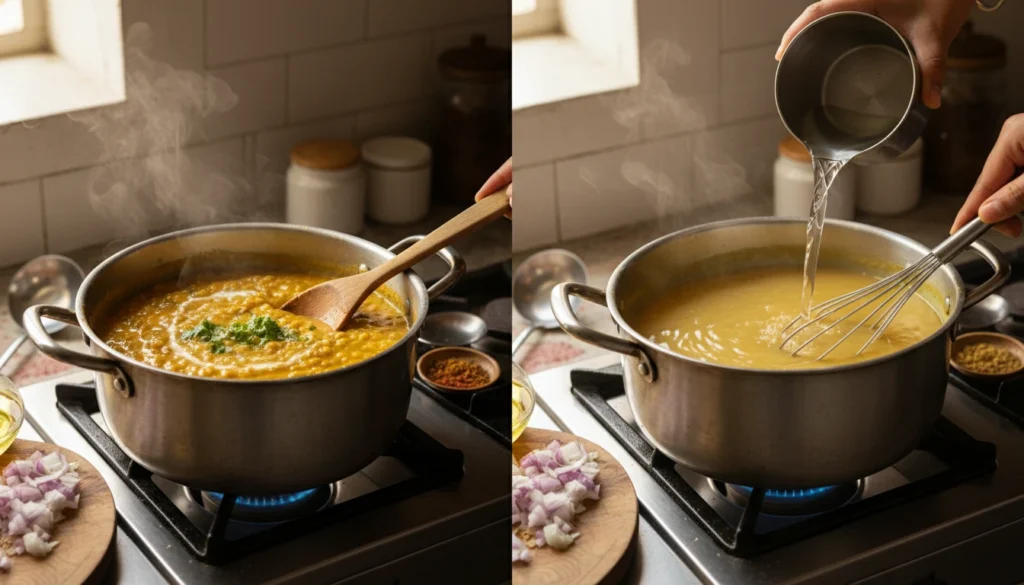
I combine rinsed lentils and measured water in a heavy pot and bring to a boil over medium-high heat. Skim foam, then reduce to a simmer.
Cook uncovered or partially covered, stirring occasionally to prevent sticking. Split lentils usually take 20–25 minutes; toor or whole lentils may take 35–50 minutes. Add more hot water if the dal gets too thick.
I use a spoon or whisk to mash some of the lentils against the pot wall for a creamier texture. Taste for salt and adjust late in cooking so the dal doesn’t tighten.
If you want smoother dal, I blend briefly with an immersion blender or strain and return to pot. Finish by adding a squeeze of lemon or a small pat of butter to brighten the flavor.
Using a Pressure Cooker or Instant Pot
I prefer a pressure cooker for speed and consistent texture. Rinse lentils and add 2.5–3 cups water per cup of split lentils in the cooker. Add turmeric and a little oil to reduce foaming.
Cook times: Instant Pot on High Pressure — 7–10 minutes for red/yellow split lentils, 10–12 minutes for toor. Natural release for 5–10 minutes cuts splatter and gives a creamier result. For stovetop pressure cookers follow your model’s timing guidelines.
After pressure release, stir and check consistency. If too thin, simmer uncovered a few minutes; if too thick, add hot water. Taste and season after pressure cooking because high heat can mute salt and spices.
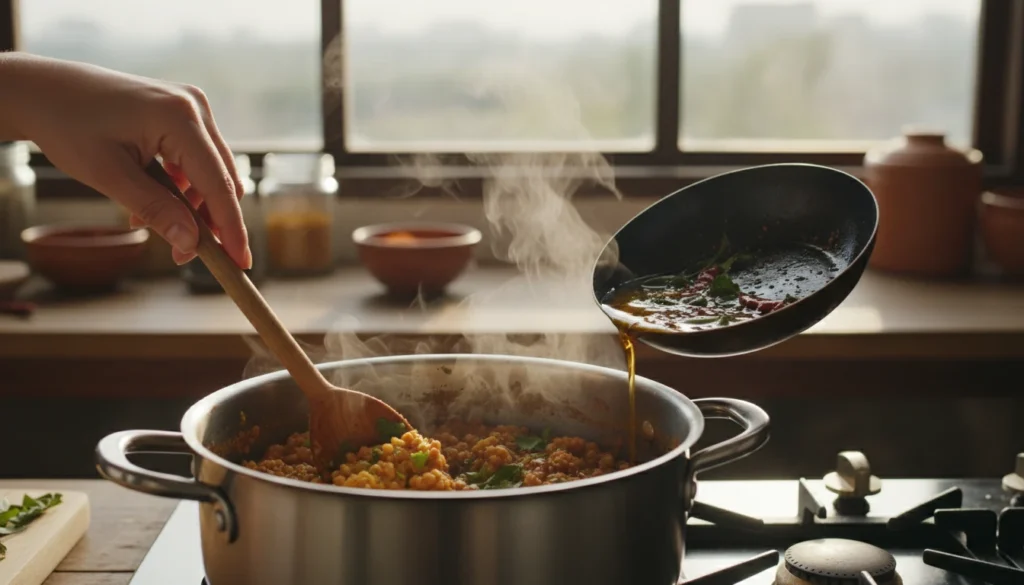
Finishing With Tadka
Tadka (tempering) is hot oil poured over the dal to add aroma and layered flavor. I heat 2–3 tablespoons oil or ghee in a small pan until shimmering.
Add mustard seeds first; when they pop, add cumin seeds, a pinch of asafoetida (hing) if available, and dried red chilies or chopped green chilies. Sauté onion, minced garlic, and ginger until golden for a richer tadka.
Pour the hot tadka immediately over the cooked dal and stir. Add chopped cilantro and a squeeze of lemon for freshness. For reference on spices and techniques, I often consult the ingredient notes at Serious Eats or the BBC’s food guides for safe handling and proportions.
Serving Suggestions for Everyday Enjoyment
I focus on simple, tasty combos that fit weeknight cooking. These ideas help you turn a pot of dal into a full, balanced meal with little extra work.
Pairing Dal With Rice or Breads
I often serve dal with plain cooked rice because it soaks up the broth and balances spices. Use basmati for a light, aromatic bed, or short-grain rice for a stickier texture. For speed, I cook rice in a rice cooker or use leftover rice reheated with a splash of water.
Bread choices change the meal feel. I warm store-bought rotis or chapatis in a hot skillet for quick bread. For a heartier plate, I toast naan or make simple parathas stuffed with mashed potato or greens. Spoon dal onto the bread and fold—this makes each bite comforting and easy to eat.
If I want a low-carb option, I serve dal with steamed vegetables or cauliflower rice. The dal still provides protein while the veg adds crunch and color.
Simple Sides and Garnishes
I keep sides minimal but flavorful. Plain yogurt or raita cools the palate and adds creaminess. A small cucumber-tomato salad dressed with lemon juice and salt brings freshness and crunch.
For garnish, I use chopped cilantro and a squeeze of lime for brightness. Tempered spices (tadka) poured over the dal just before serving adds aroma—cook mustard seeds, cumin, and crushed garlic in oil until fragrant, then drizzle it on top.
I sometimes add crunchy elements like roasted peanuts or fried onions for texture. Pickles or chutneys on the side give a salty, tangy kick that pairs well with milder dals.
Make-Ahead, Storage, and Freezing Tips
I explain how to cook dal ahead, store it safely, and reheat it so it keeps good texture and flavor. Read the quick rules below, then follow the detailed steps for batch cooking, storage, and reheating.
Batch Cooking for the Week
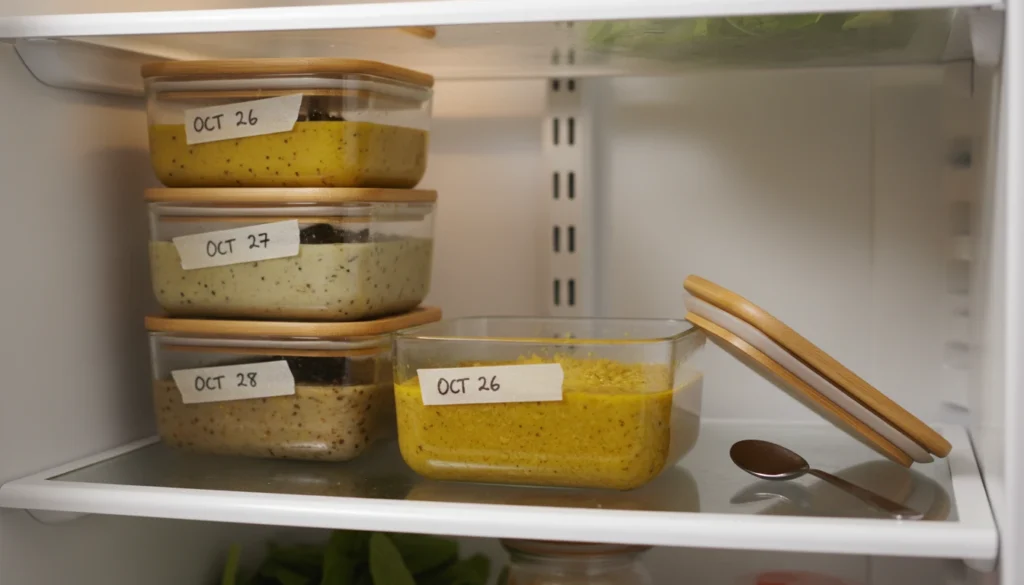
I cook a large pot of dal once or twice a week to save time. For 4–6 servings I use 2 cups dried lentils (red or yellow), cook them with 6 cups water or stock, and season after cooking so the spices stay bright. Cool the dal within 2 hours of cooking by dividing it into shallow containers to speed chilling.
Label containers with the date and contents. For fridge use, store up to 4 days; for the freezer, spoon dal into freezer-safe bags or rigid containers leaving 1 inch headspace. Portion into meal-sized packs so I only thaw what I need. If I want reheated dal with firmer lentil texture, I undercook by 1–2 minutes before cooling; the carryover heat finishes them when reheating.
Proper Storage Advice
I always cool dal uncovered on the counter for no more than 1 hour, then transfer to the fridge. Use airtight containers or heavy-duty freezer bags to prevent odor transfer and freezer burn. For bags, press out air before sealing and lay flat to save space.
Write the date on each container with a marker. Fridge life: 3–4 days. Freezer life: up to 3 months for best quality. Thaw frozen dal overnight in the fridge or place sealed bag in cold water for 30–60 minutes. If using an Instant Pot or stovetop, add a splash of water or stock after thawing to loosen the dal and recover any lost moisture. For food safety guidelines, see USDA storage tips.
Reheating Without Losing Flavor
I reheat gently to keep dal creamy and to avoid breaking the lentils. On the stovetop, warm over low heat with a 1/4 to 1/2 cup water or stock per cup of dal. Stir frequently and heat until just simmering. For microwave reheating, cover loosely and heat in 60–90 second intervals, stirring between intervals.
If the dal tastes flat after storage, brighten it by adding a squeeze of lemon, a pinch of salt, or a quick tempering of hot oil with mustard seeds, cumin, and garlic. For frozen dal, reheat straight from thawed state; if still slightly icy, warm slowly to avoid grainy texture. For Instant Pot users, use the Pot-in-Pot method to reheat evenly without sticking — place dal in a heatproof bowl and steam on low pressure for 2–3 minutes.
Easy Variations for Every Taste
I show simple ways to change a basic dal so it fits what you like and what you have on hand. These tweaks include adding fresh vegetables, trying regional spice blends, or changing the heat level.
Adding Vegetables
I often add vegetables to make dal heartier and more nutritious. Chop 1–2 cups total of firm veg like carrots, potatoes, or bell peppers and add them with the lentils so they cook together. For quick meals, stir in frozen peas, spinach, or diced tomatoes in the last 5–7 minutes.
Roasting vegetables first brings a caramelized flavor. I toss cauliflower or sweet potato with oil and roast at 425°F (220°C) for 20 minutes, then fold them into the cooked dal. If you want extra texture, sauté onions and garlic until golden and add them as a final tempering.
Tips:
- Use 1 cup lentils : 2–3 cups liquid as a base.
- Add firm veg at the start; tender greens near the end.
- Balance with a squeeze of lemon or a spoon of yogurt to brighten the dish.
Regional Twists on Classic Dal
I like to borrow simple ideas from regional dal styles to change the flavor without extra fuss. For a South Indian touch, temper mustard seeds, curry leaves, and dried red chilies in coconut oil and pour over the dal. For Punjabi-style richness, finish with ghee, garam masala, and a spoon of cream or butter.
For a Bengali note, I add a pinch of nigella seeds (kalonji) and mustard oil for a sharp, nutty edge. A Gujarati twist uses jaggery and a pinch of asafoetida for sweet-and-sour balance. Small changes like the oil, one spice, or a finishing ingredient shift the whole profile.
Easy swaps:
- South: coconut oil + curry leaves
- North: ghee + garam masala
- East: mustard oil + nigella seeds
- West: jaggery + tamarind or lemon
Adjusting Spice Levels
I adjust spices to match who will eat the dal and how it will be served. Start with 1/2 teaspoon of ground chili or 1 chopped green chili for a mild heat in a pot that serves four. Increase to 1–2 teaspoons for medium heat, and use whole dried chilies for a smoky kick.
Use this quick scale:
- Mild: omit ground chili, add black pepper and cumin.
- Medium: 1 tsp ground chili or 1 green chili.
- Hot: 1–2 tsp chili powder or 2–3 dried chilies.
I always temper the spices in oil or ghee first. Toasting cumin, mustard, or fenugreek seeds for 30–60 seconds releases their aroma and reduces raw spice bite. If the dal turns too hot, a spoon of plain yogurt or a splash of coconut milk tames the heat without losing flavor.
Troubleshooting Common Dal Issues
I focus on practical fixes that save time and keep flavor. Read the quick tips and apply the ones that match your problem.
How to Fix Overcooked or Undercooked Dal
If the dal is mushy, I stop cooking immediately and add fresh, hot water only if I need more volume. I cool it a little to slow breakdown, then gently reheat for serving without stirring too much. For texture restoration, I mix in a pot of freshly cooked, firm lentils (same type) to add body.
If the dal is undercooked, I add hot water, bring it to a gentle boil, and simmer until soft. Pressure cooker: I return the pot to the stove or use the cooker again for 2–4 minutes under pressure for dals like toor or masoor; longer for chickpeas or whole moong. For stubborn hard spots, I check for old lentils or hard water—soaking lentils 30–60 minutes and adding a pinch of baking soda speeds softening.
Solving Flavor Imbalances
If the dal tastes bland, I adjust seasoning gradually: salt first, then a squeeze of lemon or a splash of vinegar for brightness. I add roasted cumin, chopped cilantro, or a small knob of ghee to improve mouthfeel and aroma. Toasted spices in a short tarka (tempering) of oil, mustard seeds, cumin, garlic, and dried chile added at the end gives an instant flavor boost.
If the dal is too salty, I dilute with unsalted cooked lentils or plain cooked rice, or add a peeled, raw potato and simmer 10–15 minutes to absorb excess salt (discard the potato). If it’s too sour, a tiny pinch of baking soda will neutralize acidity; add sparingly and taste. If bitter, a touch of sugar or grated carrot can balance the bitterness without hiding the dal’s character.
FAQs
What type of lentils do I use?
I usually pick yellow split lentils (moong) or red lentils (masoor) because they cook fast and break down into a creamy texture. Other lentils work too, but they may need longer cooking or pre-soaking.
How long does this dal take?
I can make a simple dal in about 20–30 minutes if I use red or yellow lentils. If I use brown or whole lentils, I plan for 40–60 minutes or use a pressure cooker.
Can I make it without oil or ghee?
Yes. I often cook the lentils and add spices directly, or dry-toast spices for flavor. Tadka (tempering) with oil or ghee adds richness, but it’s optional.
How do I adjust the spice level?
I add chili gradually and taste as I go. Removing seeds from chilies or using less chili powder keeps it mild. For more heat, I add fresh chilies or a pinch of cayenne at the end.
Is dal healthy for daily meals?
I consider dal a solid, protein-rich choice that pairs well with rice or flatbread. It offers fiber and plant protein; balance it with vegetables and whole grains for a fuller meal.
Can I store and reheat dal?
I cool dal quickly, store it in the fridge for 3–4 days, and freeze up to 2 months. Reheat on the stove with a splash of water and stir well for even texture.
Conclusion
I keep this dal recipe in my weeknight rotation because it is fast, flexible, and filling. It uses simple pantry staples and basic steps that anyone can follow.
I like that the flavors improve as it sits, so it works well for meal prep. You can stretch it into soups, pair it with rice, or serve it with flatbreads for a quick dinner.
Try small swaps to match what you have on hand — different lentils, spices, or a squeeze of lemon changes the dish. I find those tweaks keep the recipe fresh without adding time or fuss.
Key takeaways:
- Ready in under an hour with minimal hands-on time.
- High in plant protein and fiber.
- Easy to scale and adapt for different meals.
I recommend making a double batch once you know the basic method. It saves time and gives you a reliable, nourishing meal ready to reheat on busy days.